Publishing OXPd2 Solutions
Any solution bundle intended for use on an HP device must be specially packaged, submitted to HP for verification and validation (VAV), and finally signed by HP before it can be installed on a production device. Companies must create an HP App Center account to submit solutions to the VAV process and to download the HP-signed solution bundle.
To receive an HP-signed solution bundle:
- Enroll your company in the App Center:
- Create an OXPd2 solution bundle:
- Develop an OXPd2 solution using the OXPd2 SDK.
- Verify and sign your solution bundle using the Solution Packaging Utility.
- Test your solution on an HP device from each applicable device group.
- Use the App Center Dashboard to:
- Register your solution (application) in the App Center:
- Upload and describe your solution.
- Self-certify the solution was properly tested and qualified.
- Define what user data it collects.
- Enroll your solution in the Catalog:
- Add solution icons and category types.
- Add Catalog information for primary language and any additional languages.
- Submit the solution for HP approval.
- Monitor the VAV approval process.
- Download the signed bundle for approved solutions.
Enrollment Process Overview
The following diagram describes the enrollment and publishing process at a very high level:
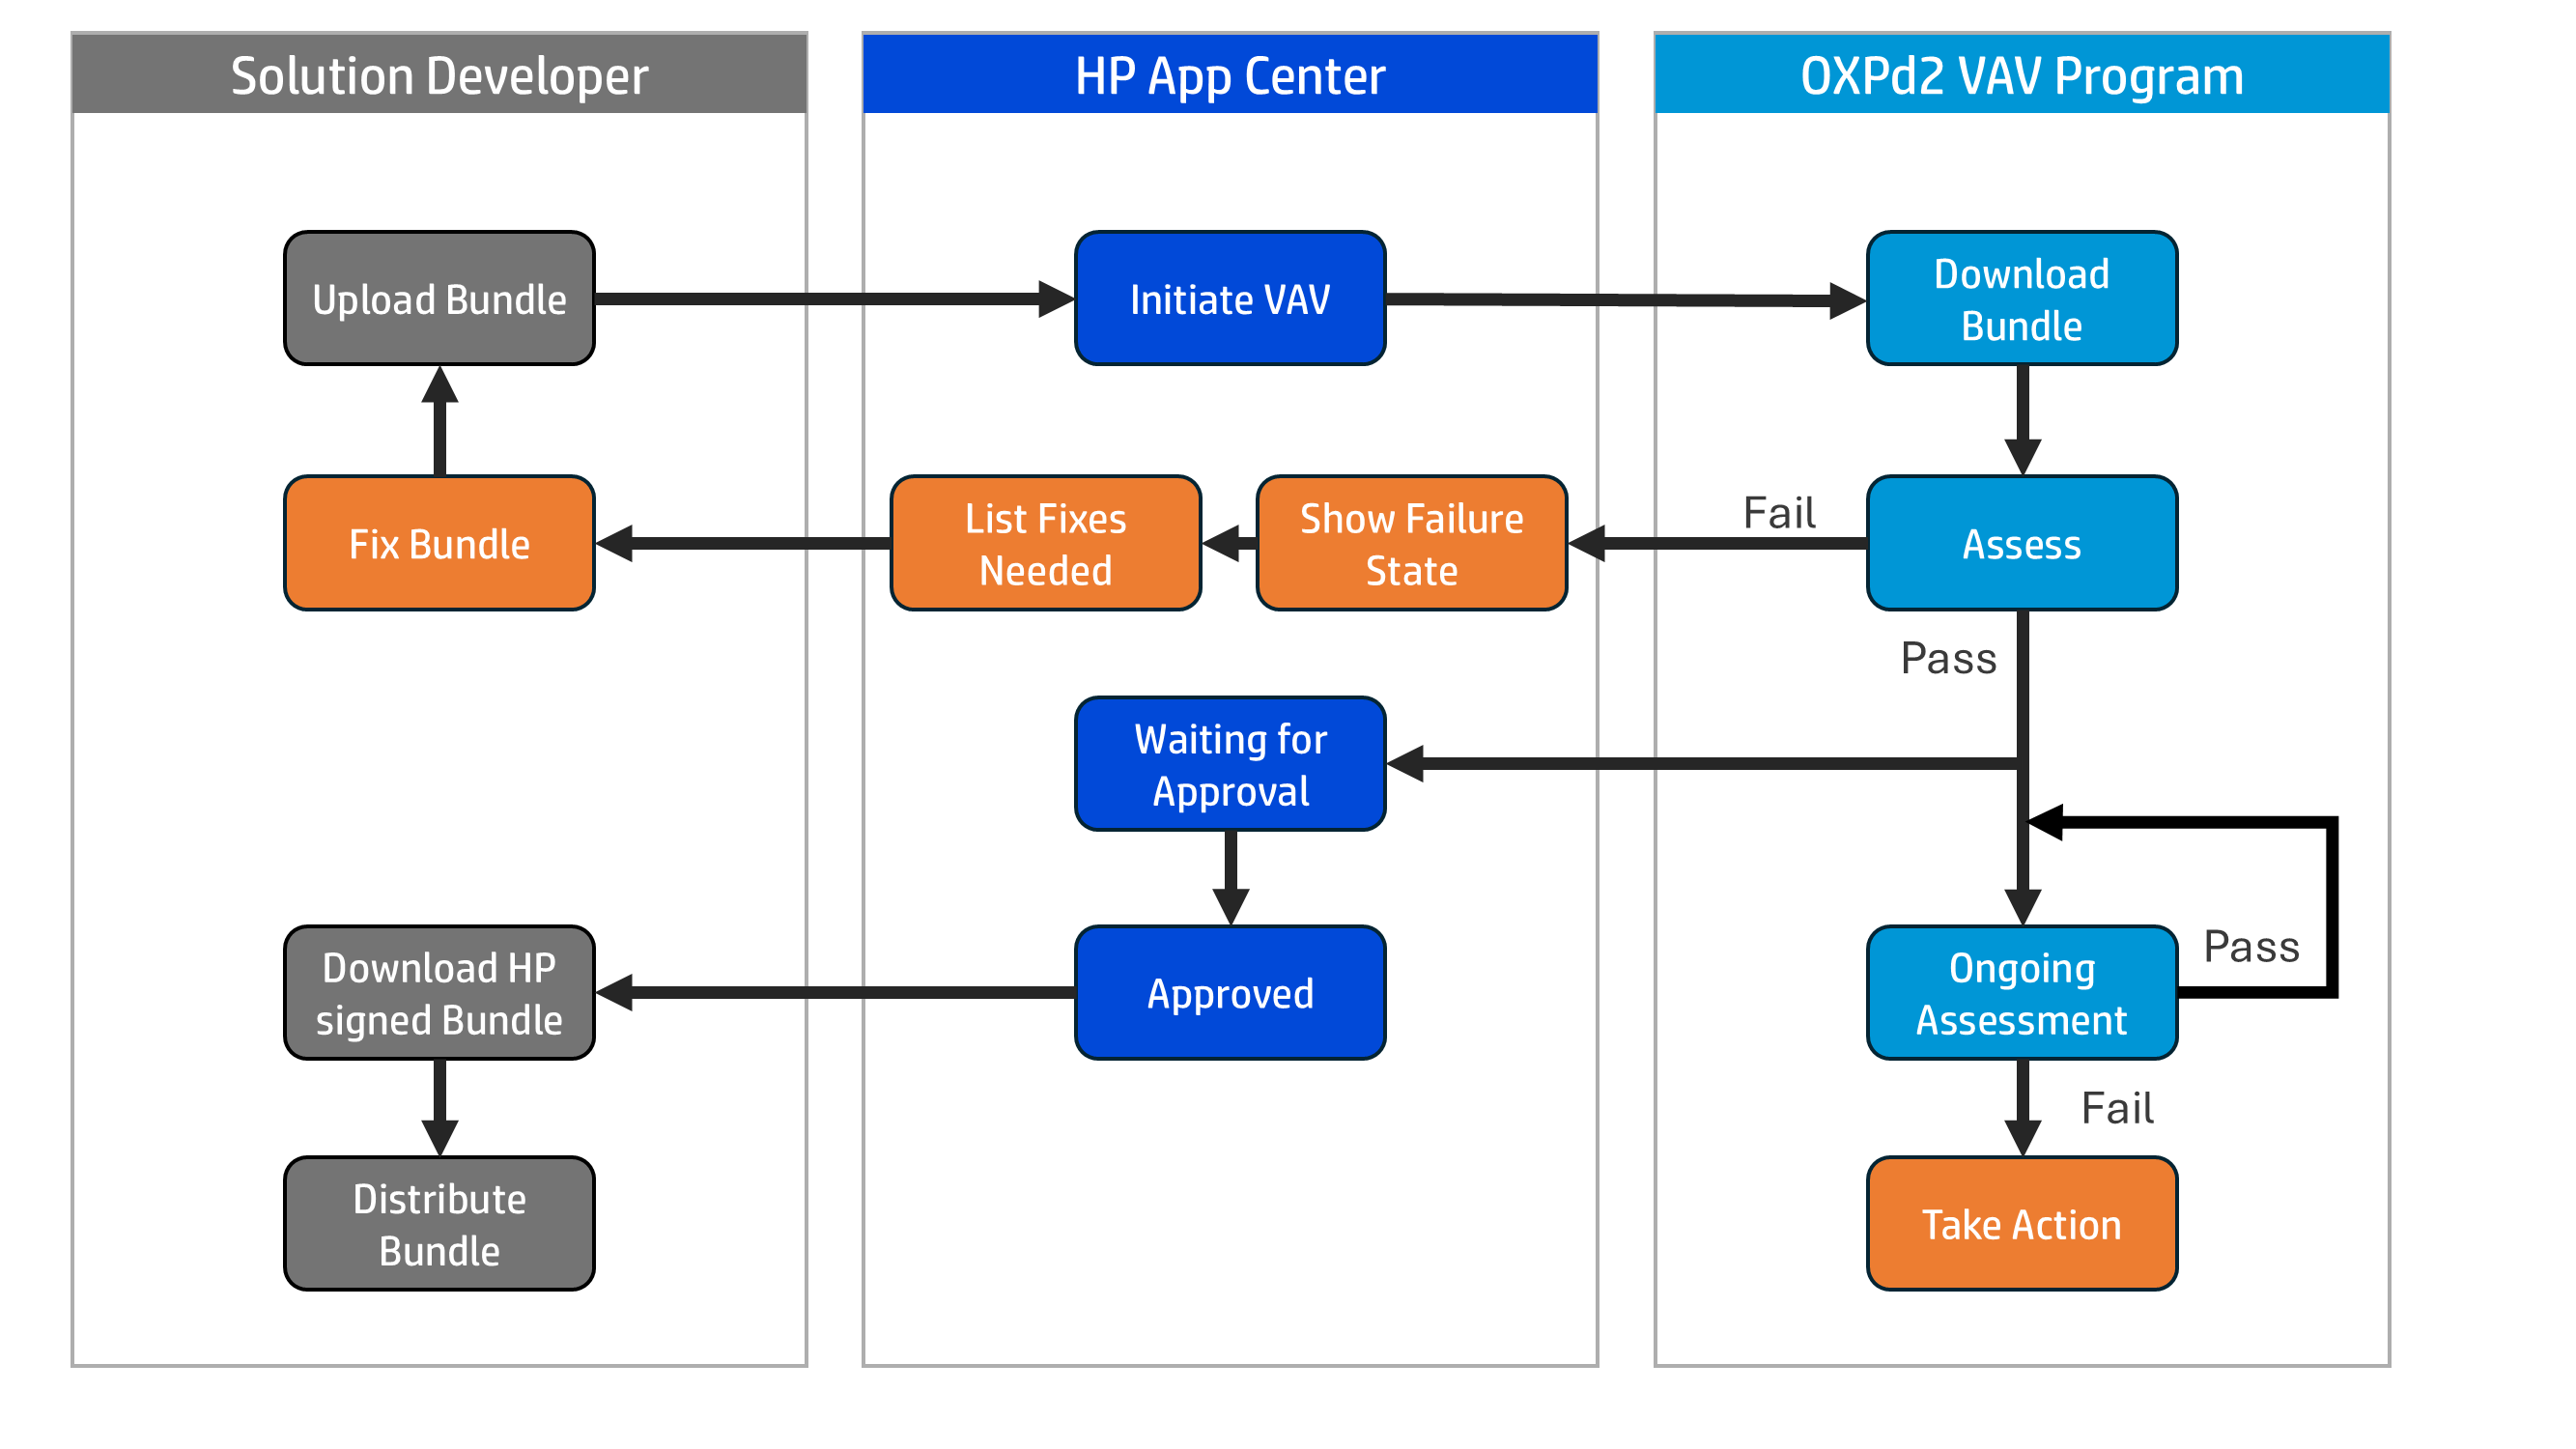
Enroll Company in App Center
Solutions are managed on the HP App Center. Before submitting any solutions, you must create a Master Admin account for your company.
Warning: Only enroll a single person through the Enroll Company workflow. The Master Admin account is used to manage all additional accounts created for your company.
Create Master Admin Account
The Master Admin account is the representative of your company and manages all aspects of the organization on the HP App Center. The first account created will automatically be assigned Master Admin status, but permissions can be transferred to other users.
To create a Master Admin account:
- Open the HP App Center in your browser.
- Click Create Account from the Sign in page.
- Note: During the beta, you must create a new HP.io account to access the App Center to prevent username conflicts. Once the beta ends, you will be able to merge this account with your existing HP.io developer account.
- Enter your First name, Last name, Email address and Password. Click Create.
- Verify your email address:
- Locate the verification email in your inbox and click Verify.
- You may also enter the six-digit code sent in the email.
- Complete the company information form:
- User ID and Role will be pre-filled.
- Enter your Company name.
- Enter your company Address.
- Read the Terms of Service and HP Privacy Statement and click the terms acknowledgement checkbox to accept.
Your Master Admin account will be created. Click Go to the Main Page to go to the App Center dashboard.
Note: There can only be one Master Admin for your company, but this role can be transferred to another user when necessary.
OXPd2 Solution Upload Requirements
OXPd2 solutions must conform to security guidelines and specifications provided in the OXPd2 SDK. HP’s VAV testing focuses on security and data protection. General guidelines include:
- Use HTTPS for all network communication.
- Use good encryption practices.
- Don’t store credentials in the solution.
- Don’t log sensitive data and keep INFO-level logging information to a minimum.
- Avoid using insecure permissions.
These guidelines are enforced by the Solution Packaging Utility provided within the SDK. Developers should package and sign all bundles using this tool.
Prior to submitting an OXPd2 solution for approval, developers must also test their solution against HP devices to verify functionality.
Device Qualification
To verify that solutions provide a consistent user experience across different HP printer configurations, all solutions must be tested on at least one device from each “MFP” (multi-function printer) group (A, B, C, D, and E).
Solutions that include printing-related functionality (such as printing, authentication, statistics, etc.) must also be tested on at least one device from each “Printer” group (F and G).
| Group | Device Type | Screen Resolution | Included Devices |
|---|---|---|---|
| Group A: A3 MFP L | LaserJet A3 MFP | 1280x800 | HP LaserJet Enterprise MFP 8601 Printer series HP LaserJet Managed MFP E826 Printer series HP Color LaserJet Enterprise MFP 8801 Printer series HP Color LaserJet Managed MFP E877 Printer series HP Color LaserJet Managed MFP E786 Printer series HP LaserJet Managed MFP E731 Printer series |
| Group B: A4 MFP L | LaserJet A4 MFP | 1280x800 | HP Color LaserJet Enterprise MFP X677 series HP Color LaserJet Enterprise MFP X58045 series HP Color LaserJet Enterprise MFP X57945 series |
| Group C: A3 MFP M | LaserJet A3 MFP | 1024x768 | HP Color LaserJet Managed MFP E785 Printer series HP LaserJet Managed MFP E730 Printer series |
| Group D: A4 MFP M | LaserJet A4 MFP | 1024x768 | HP Color LaserJet Enterprise MFP 6800/6801 series HP Color LaserJet Enterprise MFP 5800 series |
| Group E: A4 MFP S | LaserJet A4 MFP | 480x272 | HP LaserJet Enterprise MFP M430/M431 series HP Color LaserJet Enterprise MFP M480 series HP Color LaserJet Managed MFP E47528 series |
| Group F: A4 Printer S | LaserJet A4 Printer | 480x272 | HP Color LaserJet 6700/6701 series HP Color LaserJet X654 series HP Color LaserJet Enterprise 5700 series HP Color LaserJet X557 series |
| Group G: A4 Printer XS | LaserJet A4 Printer | 320x240 | HP Color LaserJet M455 series HP LaserJet M400 Printer series HP LaserJet Enterprise M407 series |
These groupings are determined by device functionality, configuration, and display size. All required groups must be represented in solution testing to ensure solution compatibility with the full range of HP devices.
Solutions must be tested on the latest available firmware at the time of app submission. Go to HP FutureSmart Latest Firmware Versions to check the latest available firmware for a device.
App Center Dashboard
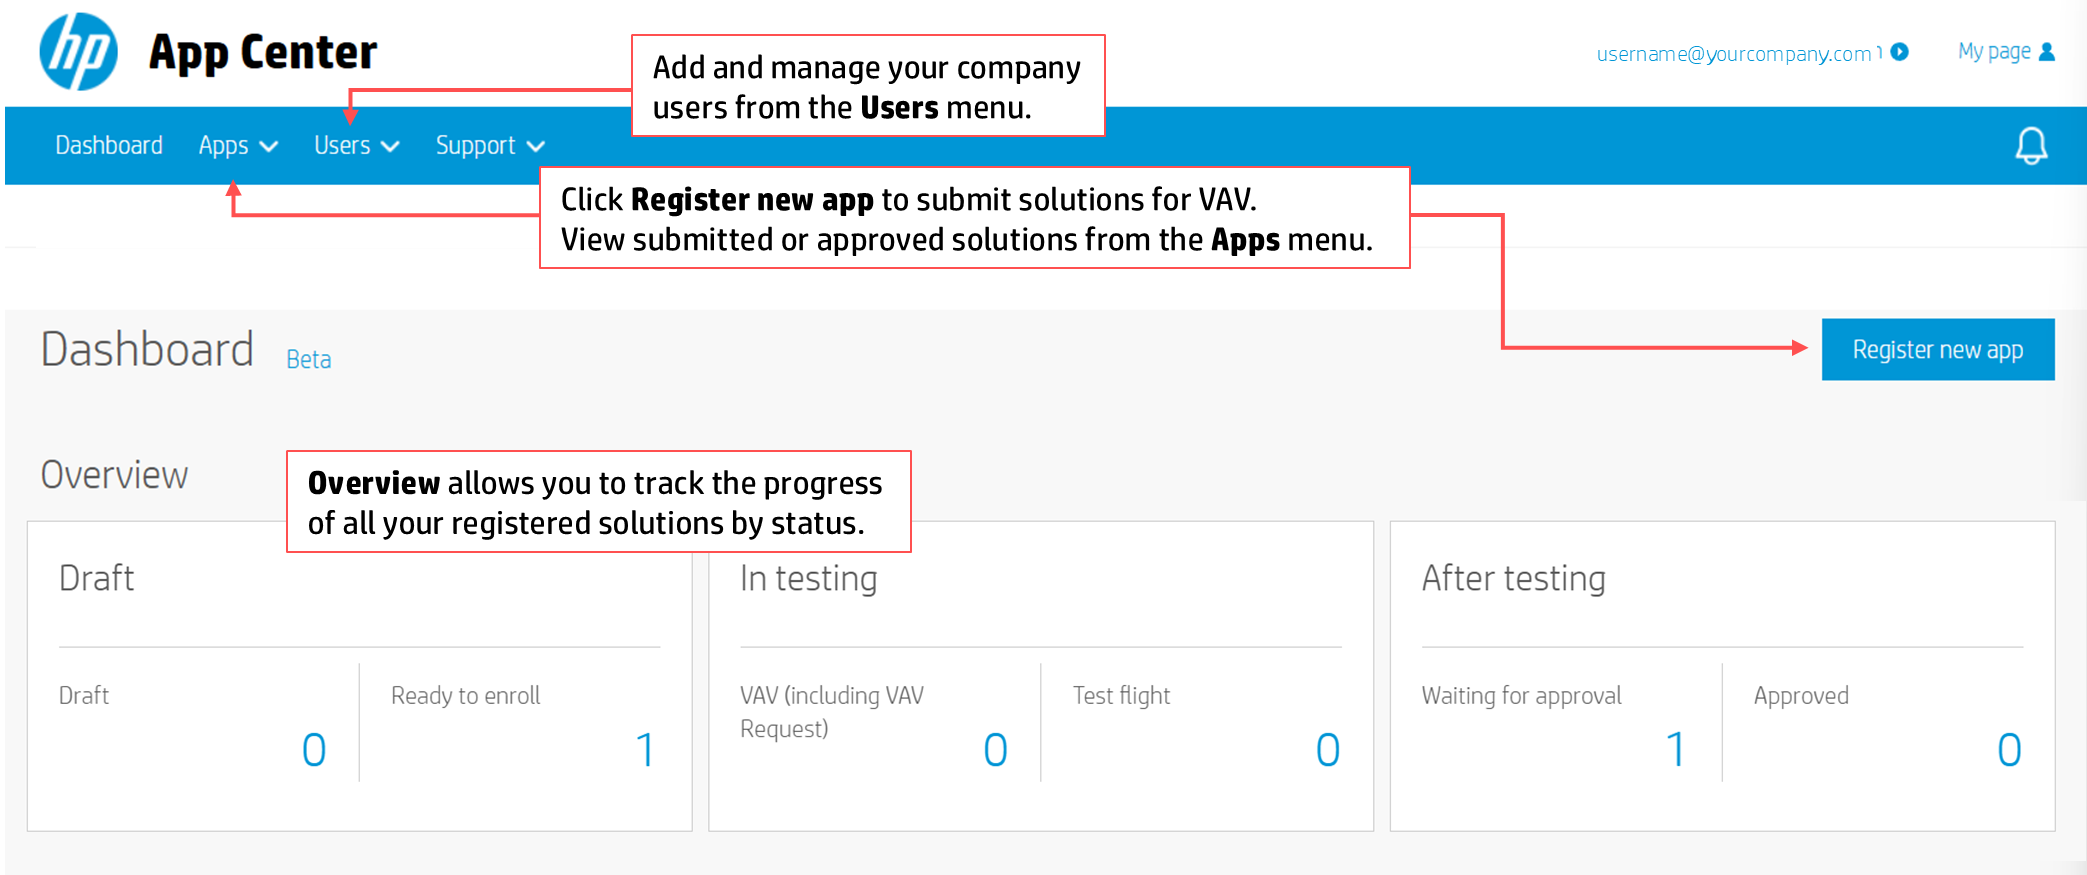
The Dashboard allows you to manage users and solutions (applications) associated with your company account.
- Manage users - invite new users and manage user roles and permissions.
- Manage solutions - submit new solutions for approval, and manage submitted and approved solutions.
User Management
Users can be managed from the user management page, accessed by selecting User list from the Users drop-down menu.
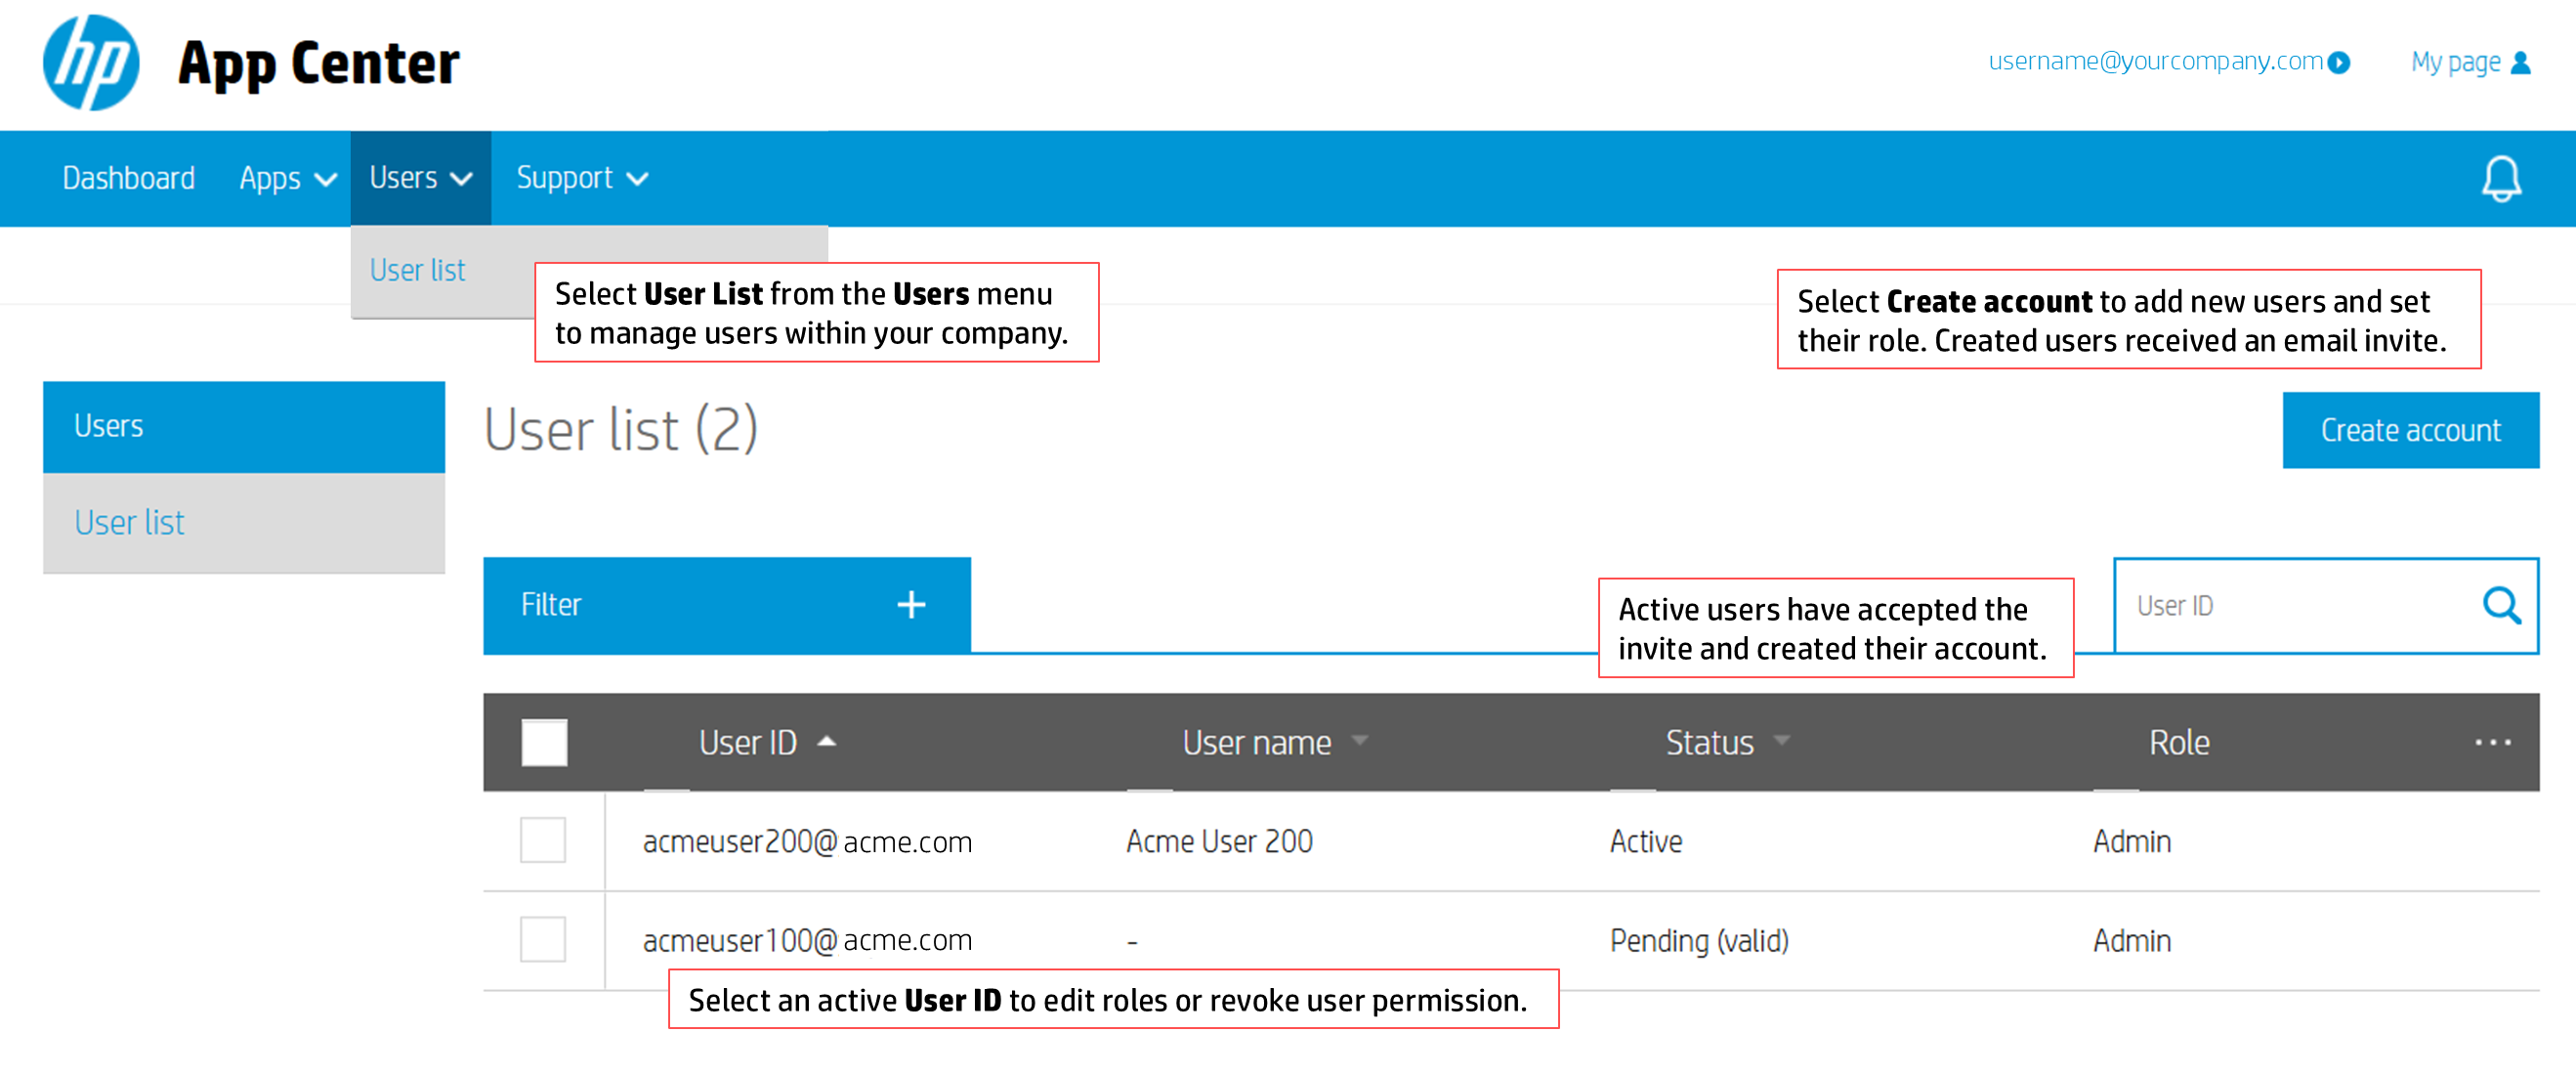
From this page, you can:
Invite Users
New users can be invited from the User list page. New users must be invited by the Master Admin or an Admin user.
To invite a new user:
- Select User list from the Users drop-down menu.
- Click Create account.
- Type the Email address for the user you wish to invite.
- Select a Role for the user based on required permissions:
- Admin:
- Invite and manage users to perform Developer and Business Developer roles.
- Register new solutions.
- Manage App Info and Data Collection solution information.
- Manage listing information for solutions.
- Developer:
- Start the registration process for new solutions.
- Manage App Info and Data Collection solution information.
- View listing information for solutions.
- Business Development:
- Complete the registration process for new solutions.
- View App Info and Data Collection solution information.
- Manage listing information for solutions.
- Admin:
- Click Save to send an email with an onboarding link to the user’s email address.
To accept the invitation, the user must click the Sign Up link located in the email, create a user account, and accept the terms and conditions.
Manage User Permissions
To edit a user’s permissions, click the User ID you would like to edit. The user information will display. Options depend on user status.
- Edit: Allows you to select a new Role for the user.
- Only available for Active users (users who have accepted the invitation).
- To change user role, select the desired role from the Role drop-down menu.
- Square icon - Click to populate Remove and Delegate options.
- Remove: Deletes the user.
- Delegate: Transfers your role to the user.
- Note: Delegate can be used to transfer Master Admin role to another user. Only one Master Admin account is allowed per company.
- Resend: Resend an invitation to replace expired onboarding emails.
- Only available for Pending users (users who did not accept the invitation in the first 48 hours).
Manage Applications
Solutions can be managed from the Apps drop-down menu.
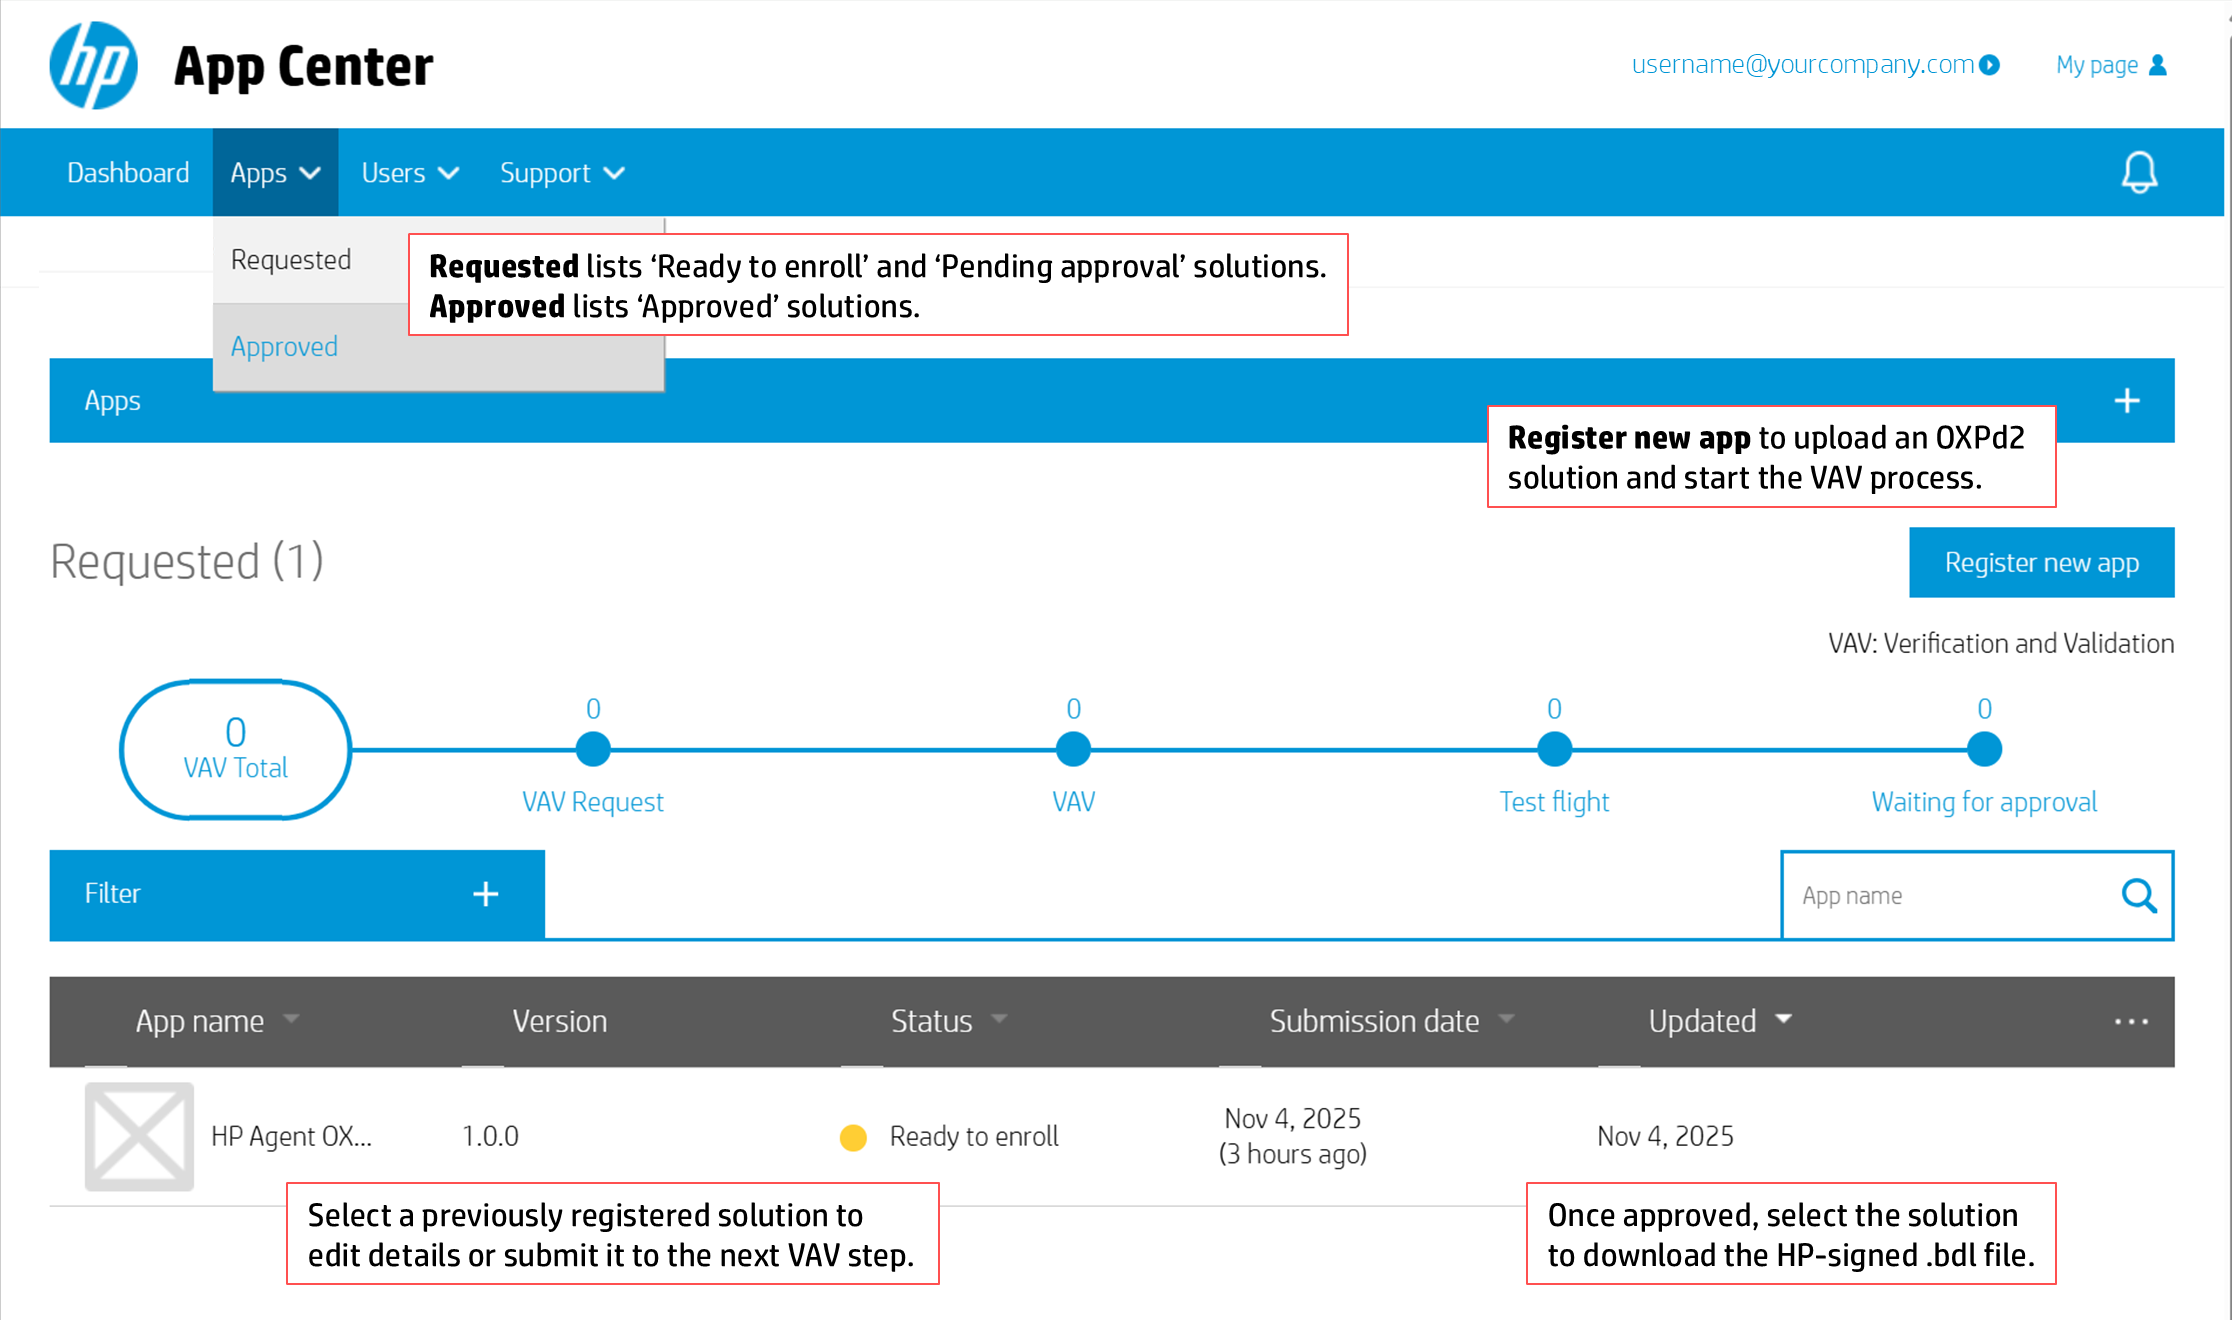
From this page, select:
- Register new app to submit a new solution for approval.
- Requested to view, edit, or process solutions awaiting approval.
- Approved to view, manage, or download approved solutions.
Register New App
Registering a new app allows you to submit your self-signed OXPd2 solution bundle for VAV approval.
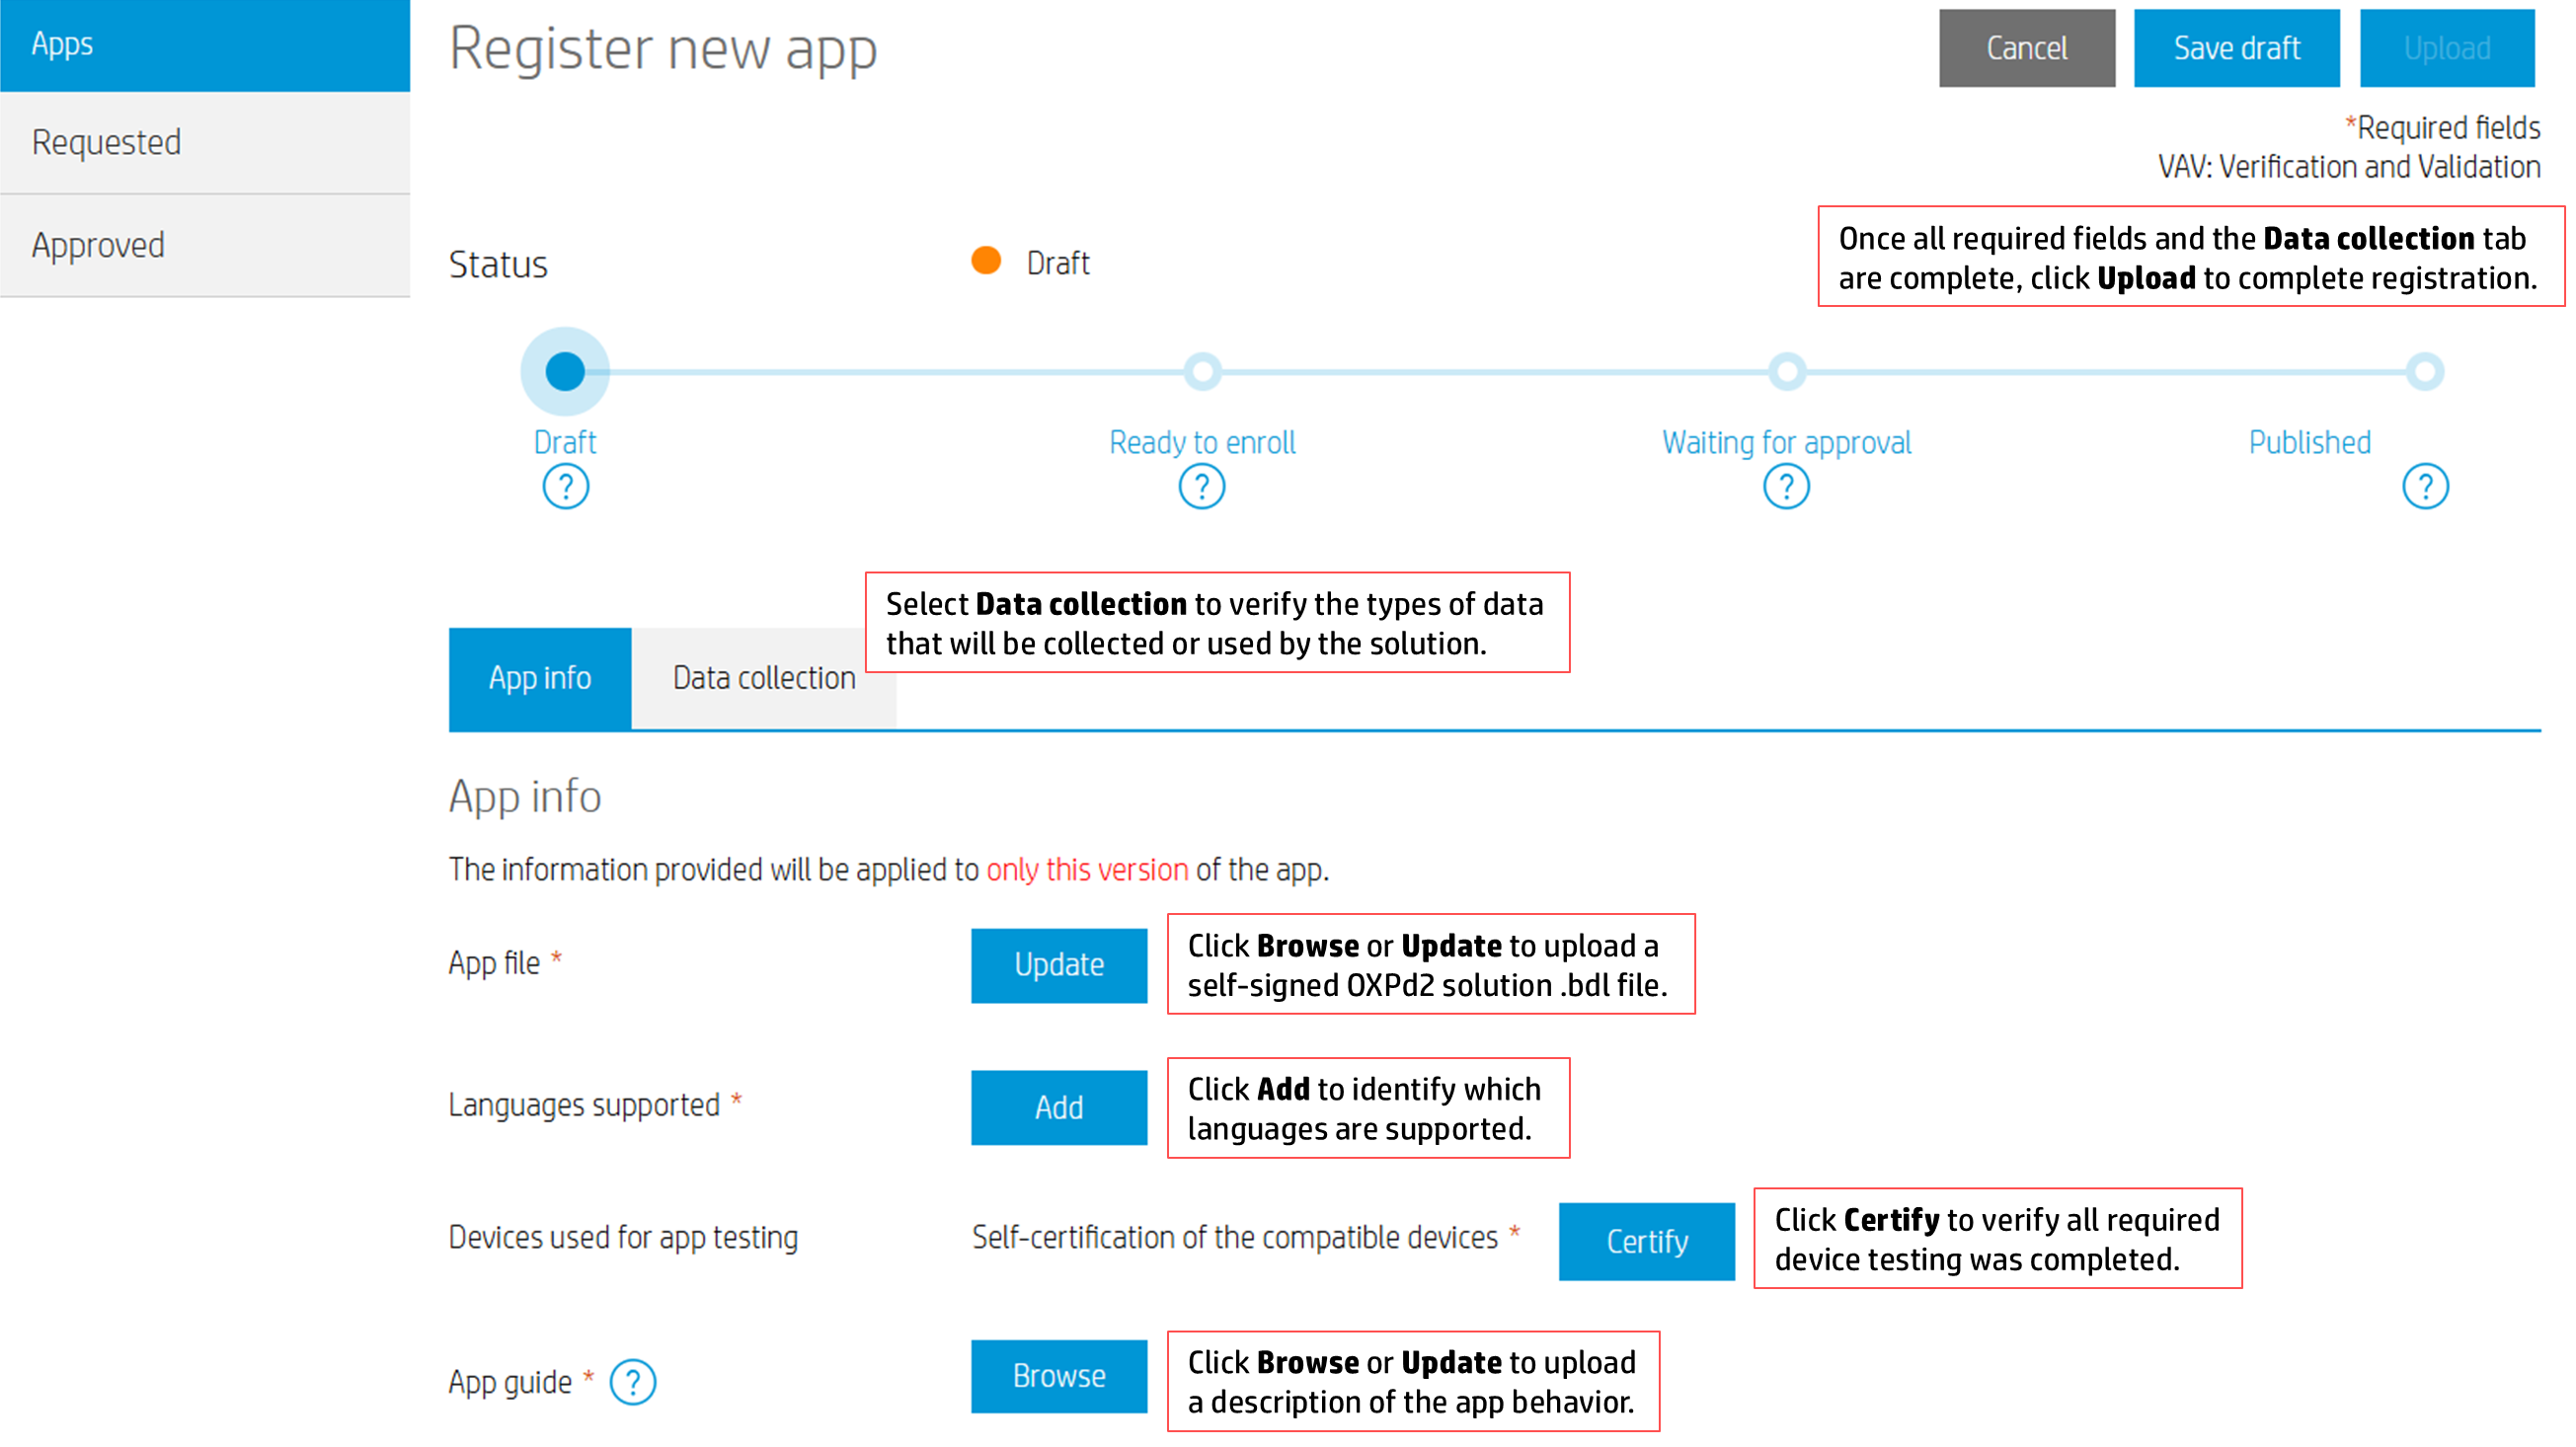
To register a solution on the App Center:
- Click Register new app from the Dashboard or the Apps > Requested screen to open the “Register new app” screen.
- Upload your self-signed solution bundle:
- Click Browse in the App file field to open the file browser.
- Select the self-signed solution bundle and click Open to attach.
- Note: Solution bundles can be pre-verified and self-signed using the Solution Packaging Utility, available within the OXPd2 SDK. This solution bundle cannot exceed 100 MB.
- Add languages supported by your solution.
- Click Add in the Languages supported field to open the Add language menu.
- Select all languages that have localization (i18n) assets added.
- Click Add to finalize selections.
- Self-certify compatible devices:
- Click Certify in the Devices used for app testing field to open the Self Certification of App Quality form.
- Review Requirements to verify all requirements have been met.
- Verify a qualifying device from each group has been tested.
- Check each self-certification box that applies.
- Click OK.
- Upload application documentation:
- Click Update in the App guide field to open the file browser.
- Select the application guide document and click Open to attach.
- Define types of data the solution will collect and use:
- Click Data collection to display Data collection fields.
- Check all types of data that will be collected or used by the solution.
- Note: If no data will be collected, check None of the following types of data will be collected.
- Click Upload to complete upload.
The status of the request will change to “Ready to enroll”. The solution will appear in the Requested list of the Apps page. Users with Admin and Business Development roles may add or modify Catalog information for the solution.
Note: To save a draft of the application, click Save Draft.
Enrolling Solutions
Once a solution has been uploaded to the portal, the Catalog Listing tab must be completed prior to final submission for VAV. This is completed under the Apps > Requested tab.
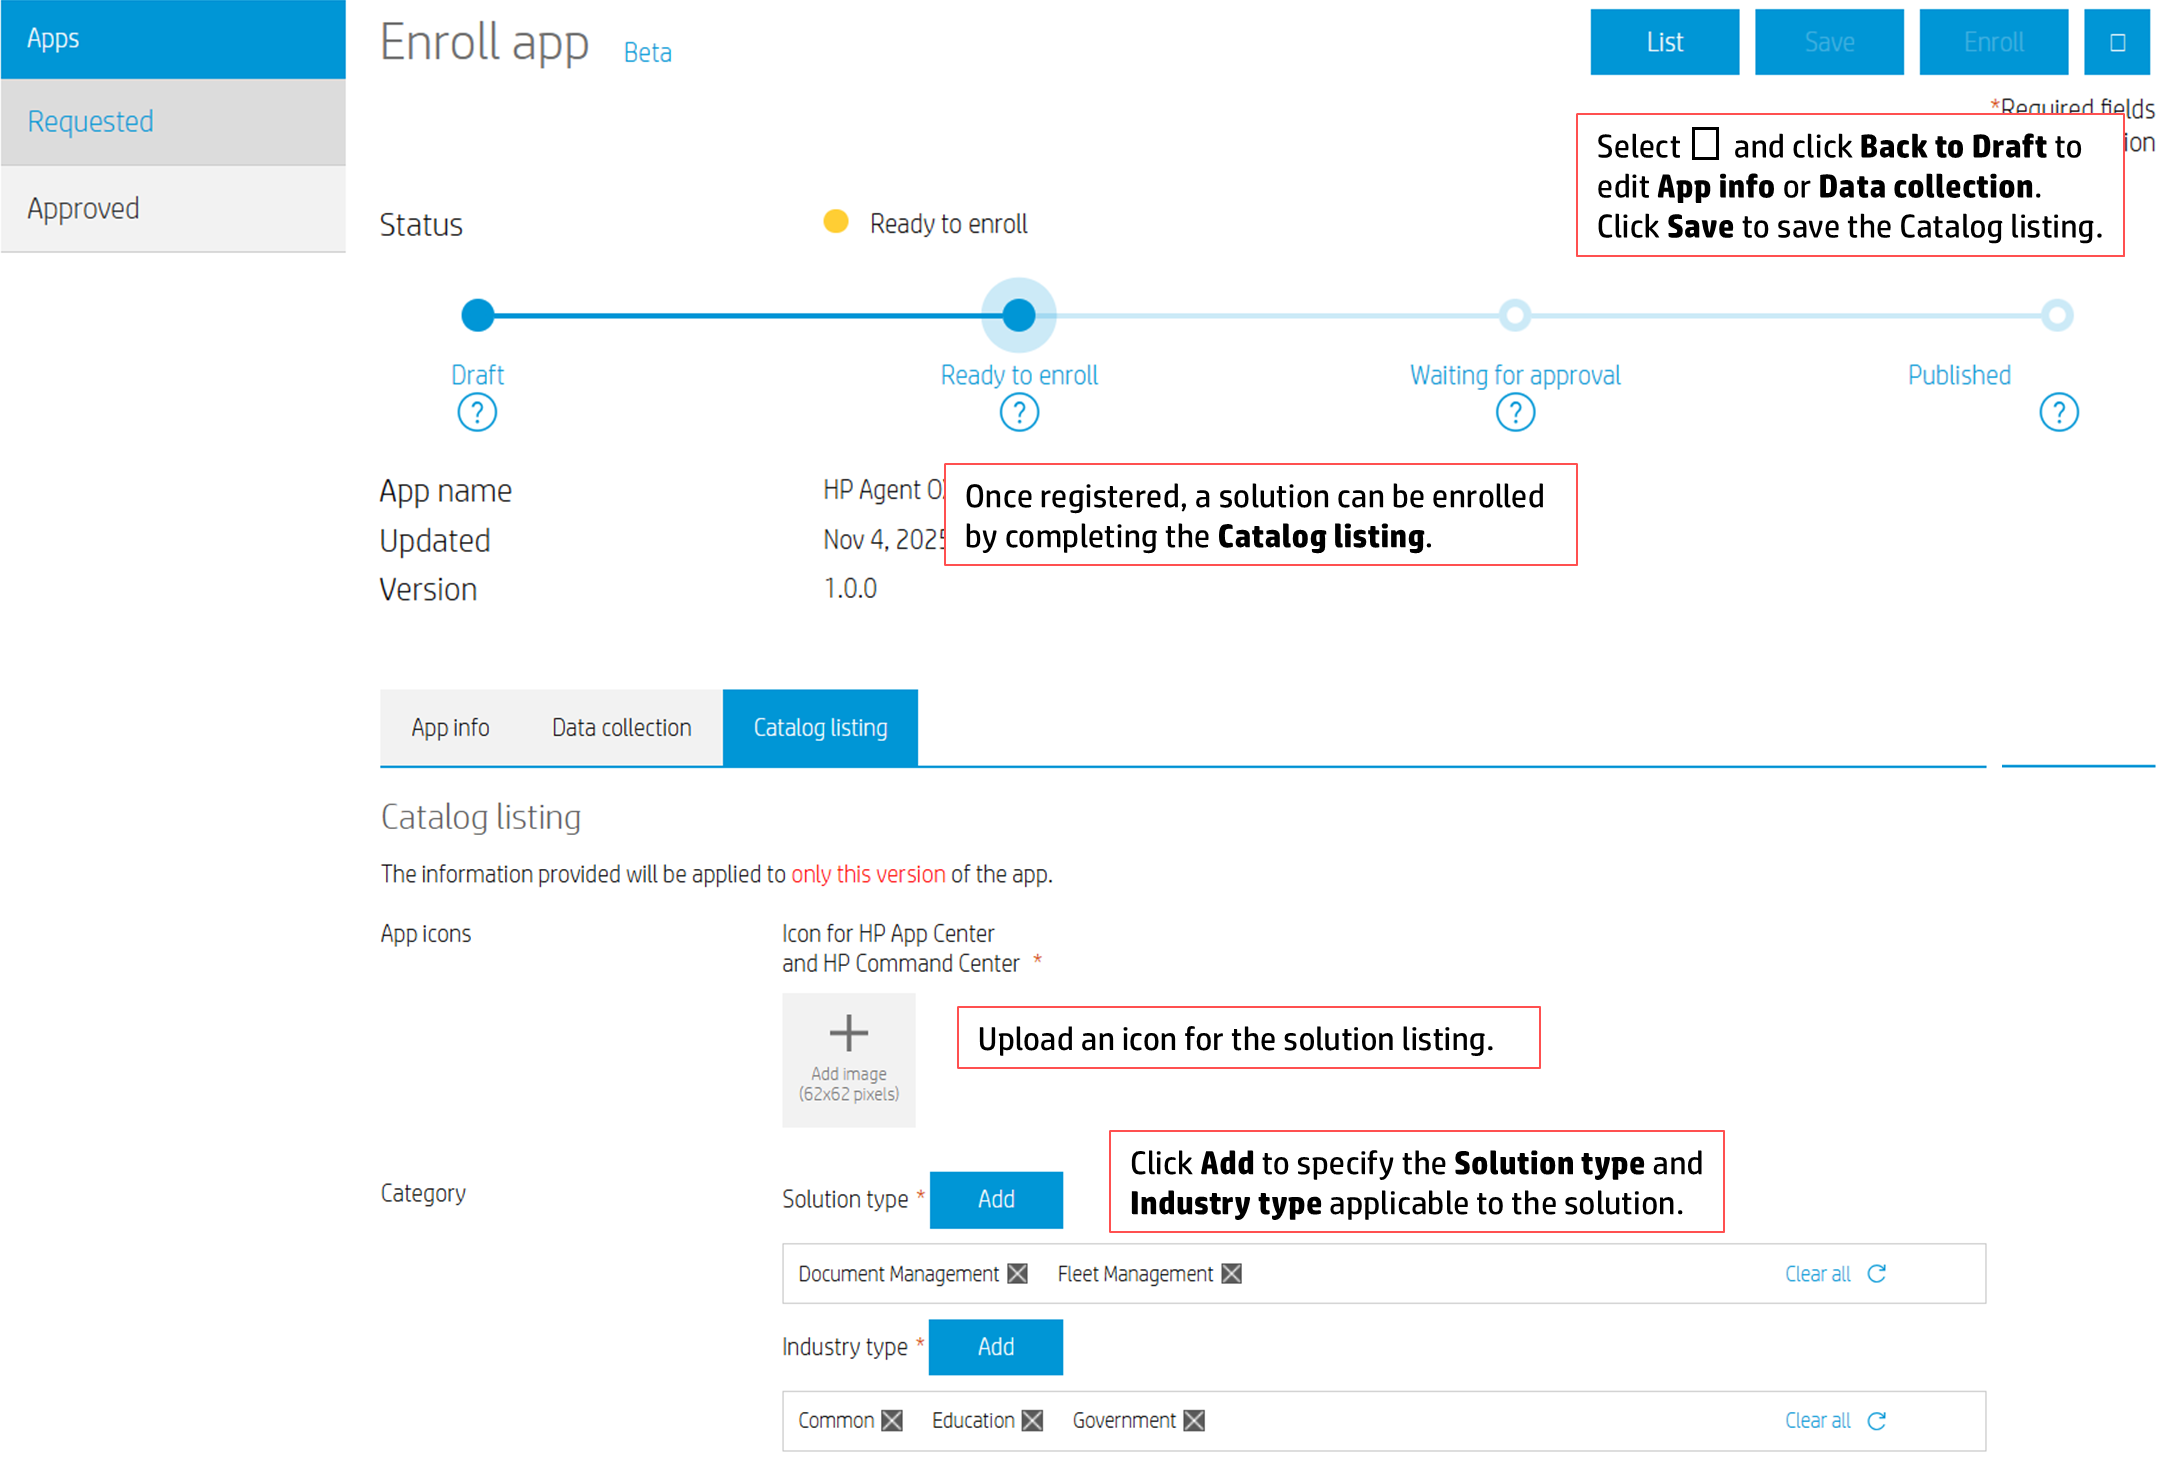
To update the solution’s Catalog Listing:
- Select Requested under the Apps drop-down menu.
- Select the solution you previously uploaded. The status should indicate it is “Ready to Enroll”.
- Select the Catalog listing tab on the Enroll App page.
- Upload an app icon (required):
- Click Add Image in the App icons field to open the file browser.
- Select your solution icon.
- Note: Solution icons should be 62x62 pixel images.
- Add Solution type and Industry type categories (required):
- Select Add to open the Add Solution Type category picker.
- Select all appropriate solution categories and click Add.
- Select Add to open the Add Industry Type category picker.
- Select all appropriate industry categories and click Add.
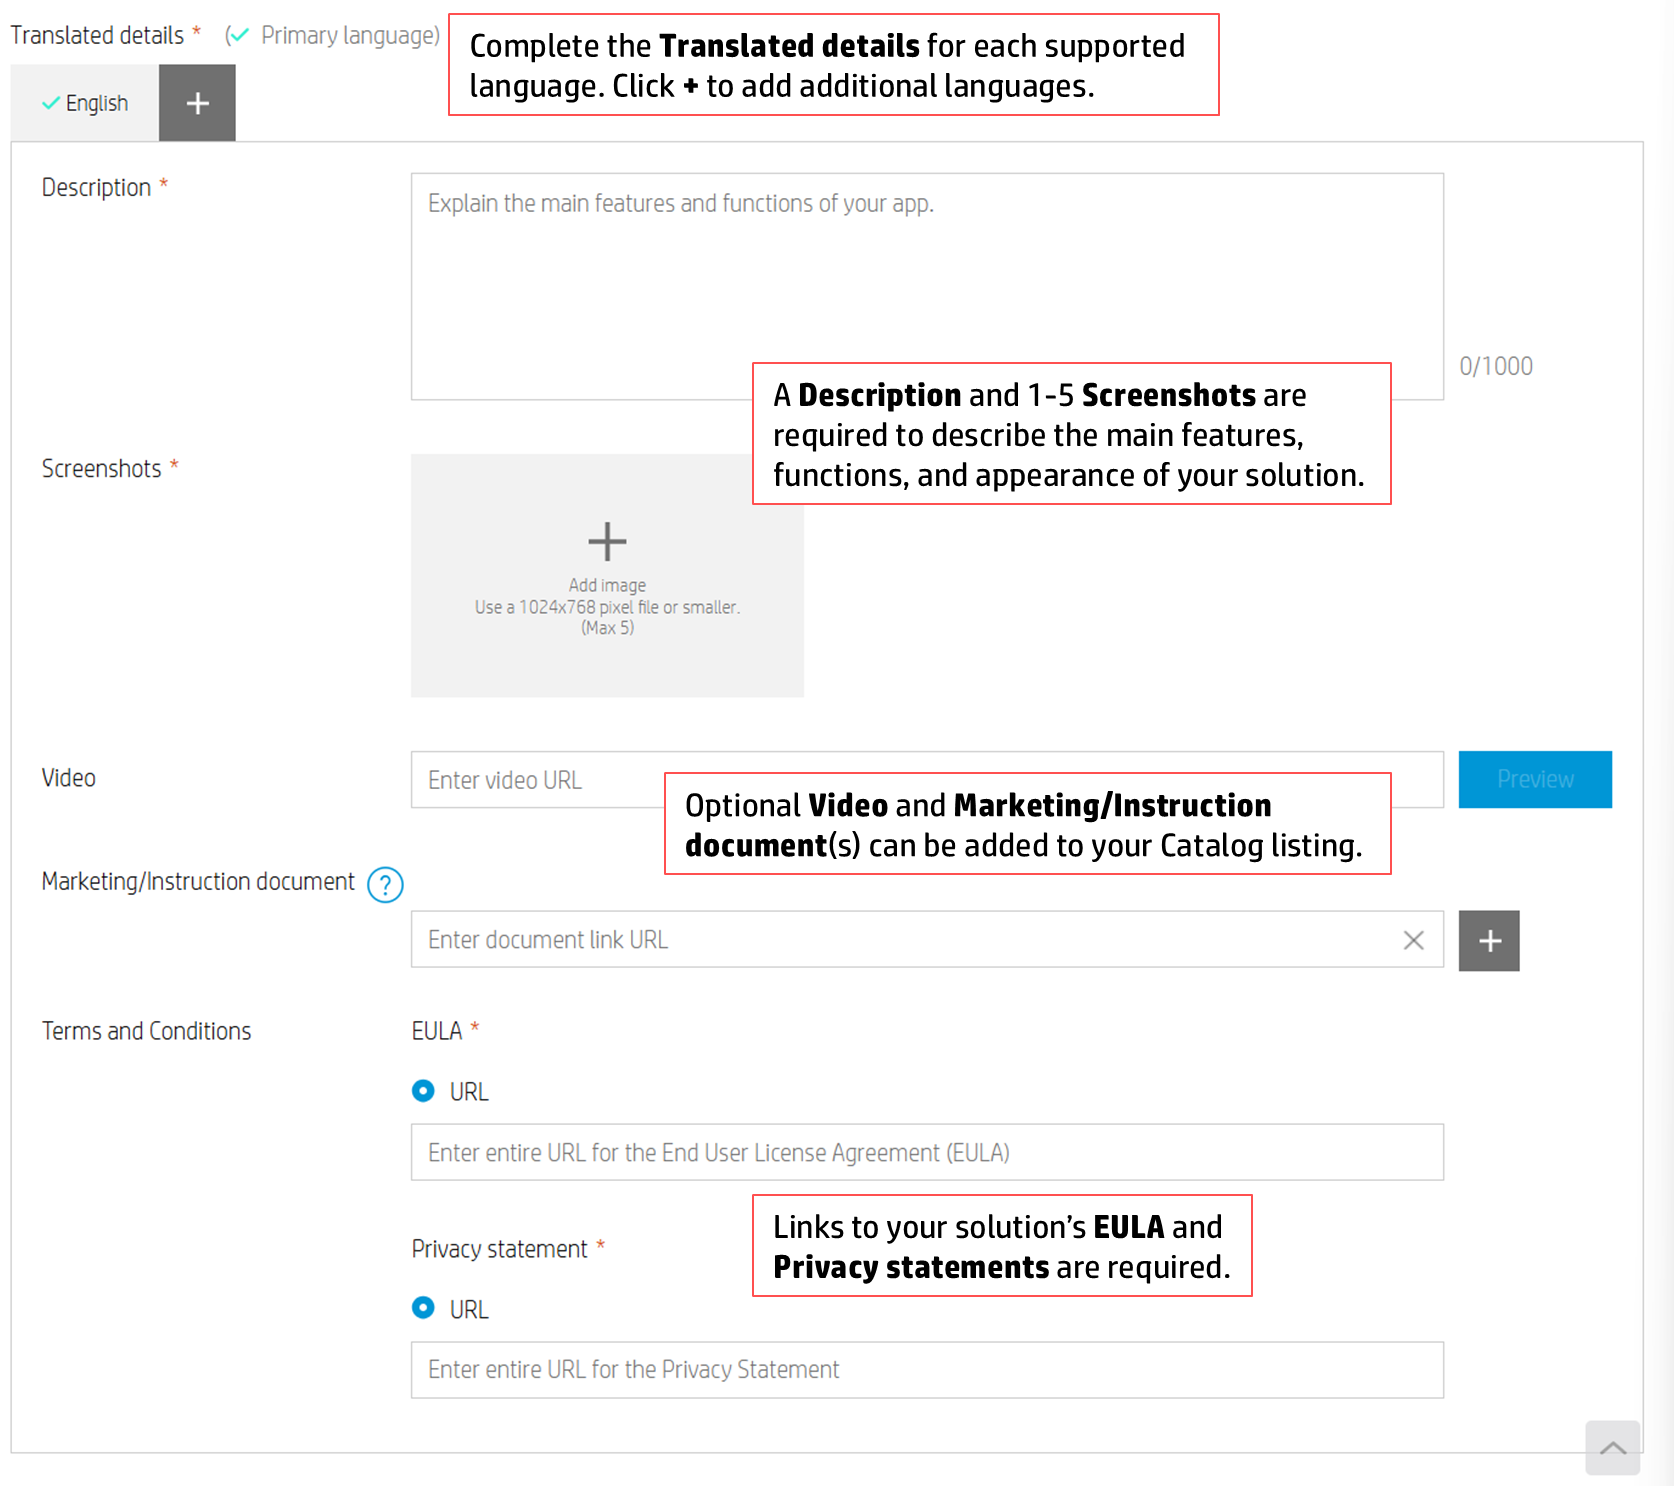
- Add details for the primary language (required):
- Type a Description for the solution that explains the main features and functions of your app.
- Add screenshot images of your solution.
- Note: Attach between 1 and 5 screenshots, no larger than 1024x768 pixels each.
- Add an optional Video URL link for marketing or instructional purposes.
- Add an optional Marketing/Instruction document URL link. Click the + icon to add additional documents.
- Add an EULA URL link (required).
- Add a Privacy statement URL link (required).
- Add any additional languages appropriate for your solution (optional):
- Click the + icon in the Translated details field next to the primary language.
- Select the language to add from the Select language pop-up window.
- Update the new language tab with localized language assets for each field.
- Note: Clicking the X button on the localized language tab will delete the language tab and any data included within it.
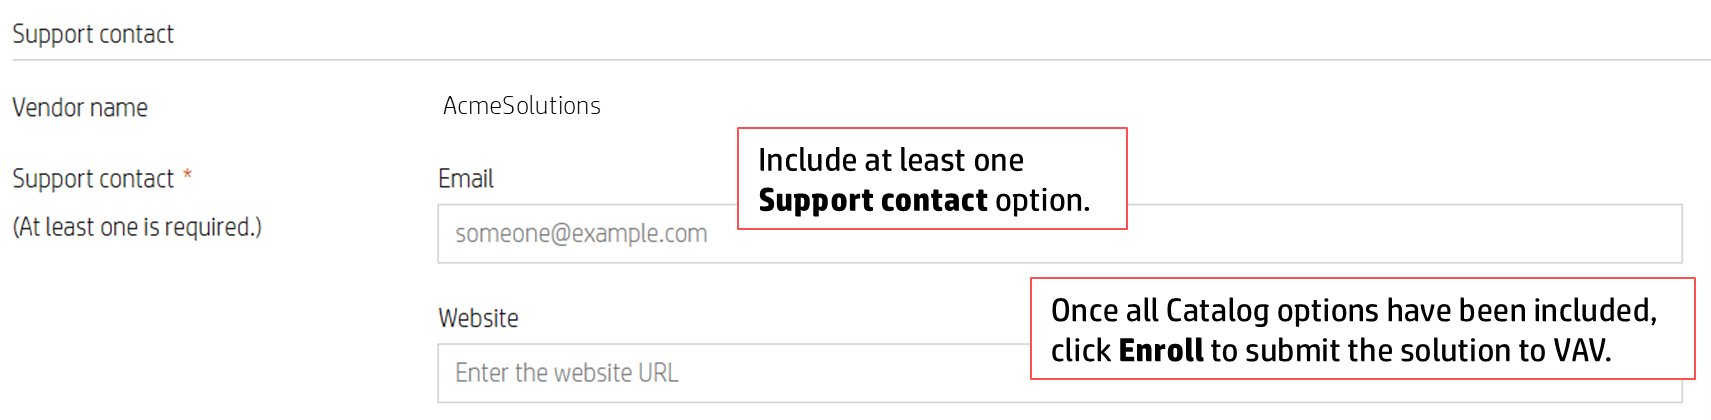
- Add Support Contact details:
- Verify Vendor name is correct.
- Note: This information is pulled directly from the package being uploaded.
- Add Support contact details (at least one required):
- Email - A support email address.
- Website - A support website URL.
- Click Enroll to complete enrollment.
Once a solution has been enrolled, it will be submitted to VAV for approval.
Note: To save a draft of the enrollment, click Save.
Validation and Verification
After being enrolled, the solution will enter an “Awaiting approval” status as the VAV process is completed. This process is completely automated and generally completes quickly. If any errors are detected during the VAV process, you will be notified of the vulnerability and given a list of recommended actions to fix these issues prior to resubmission.
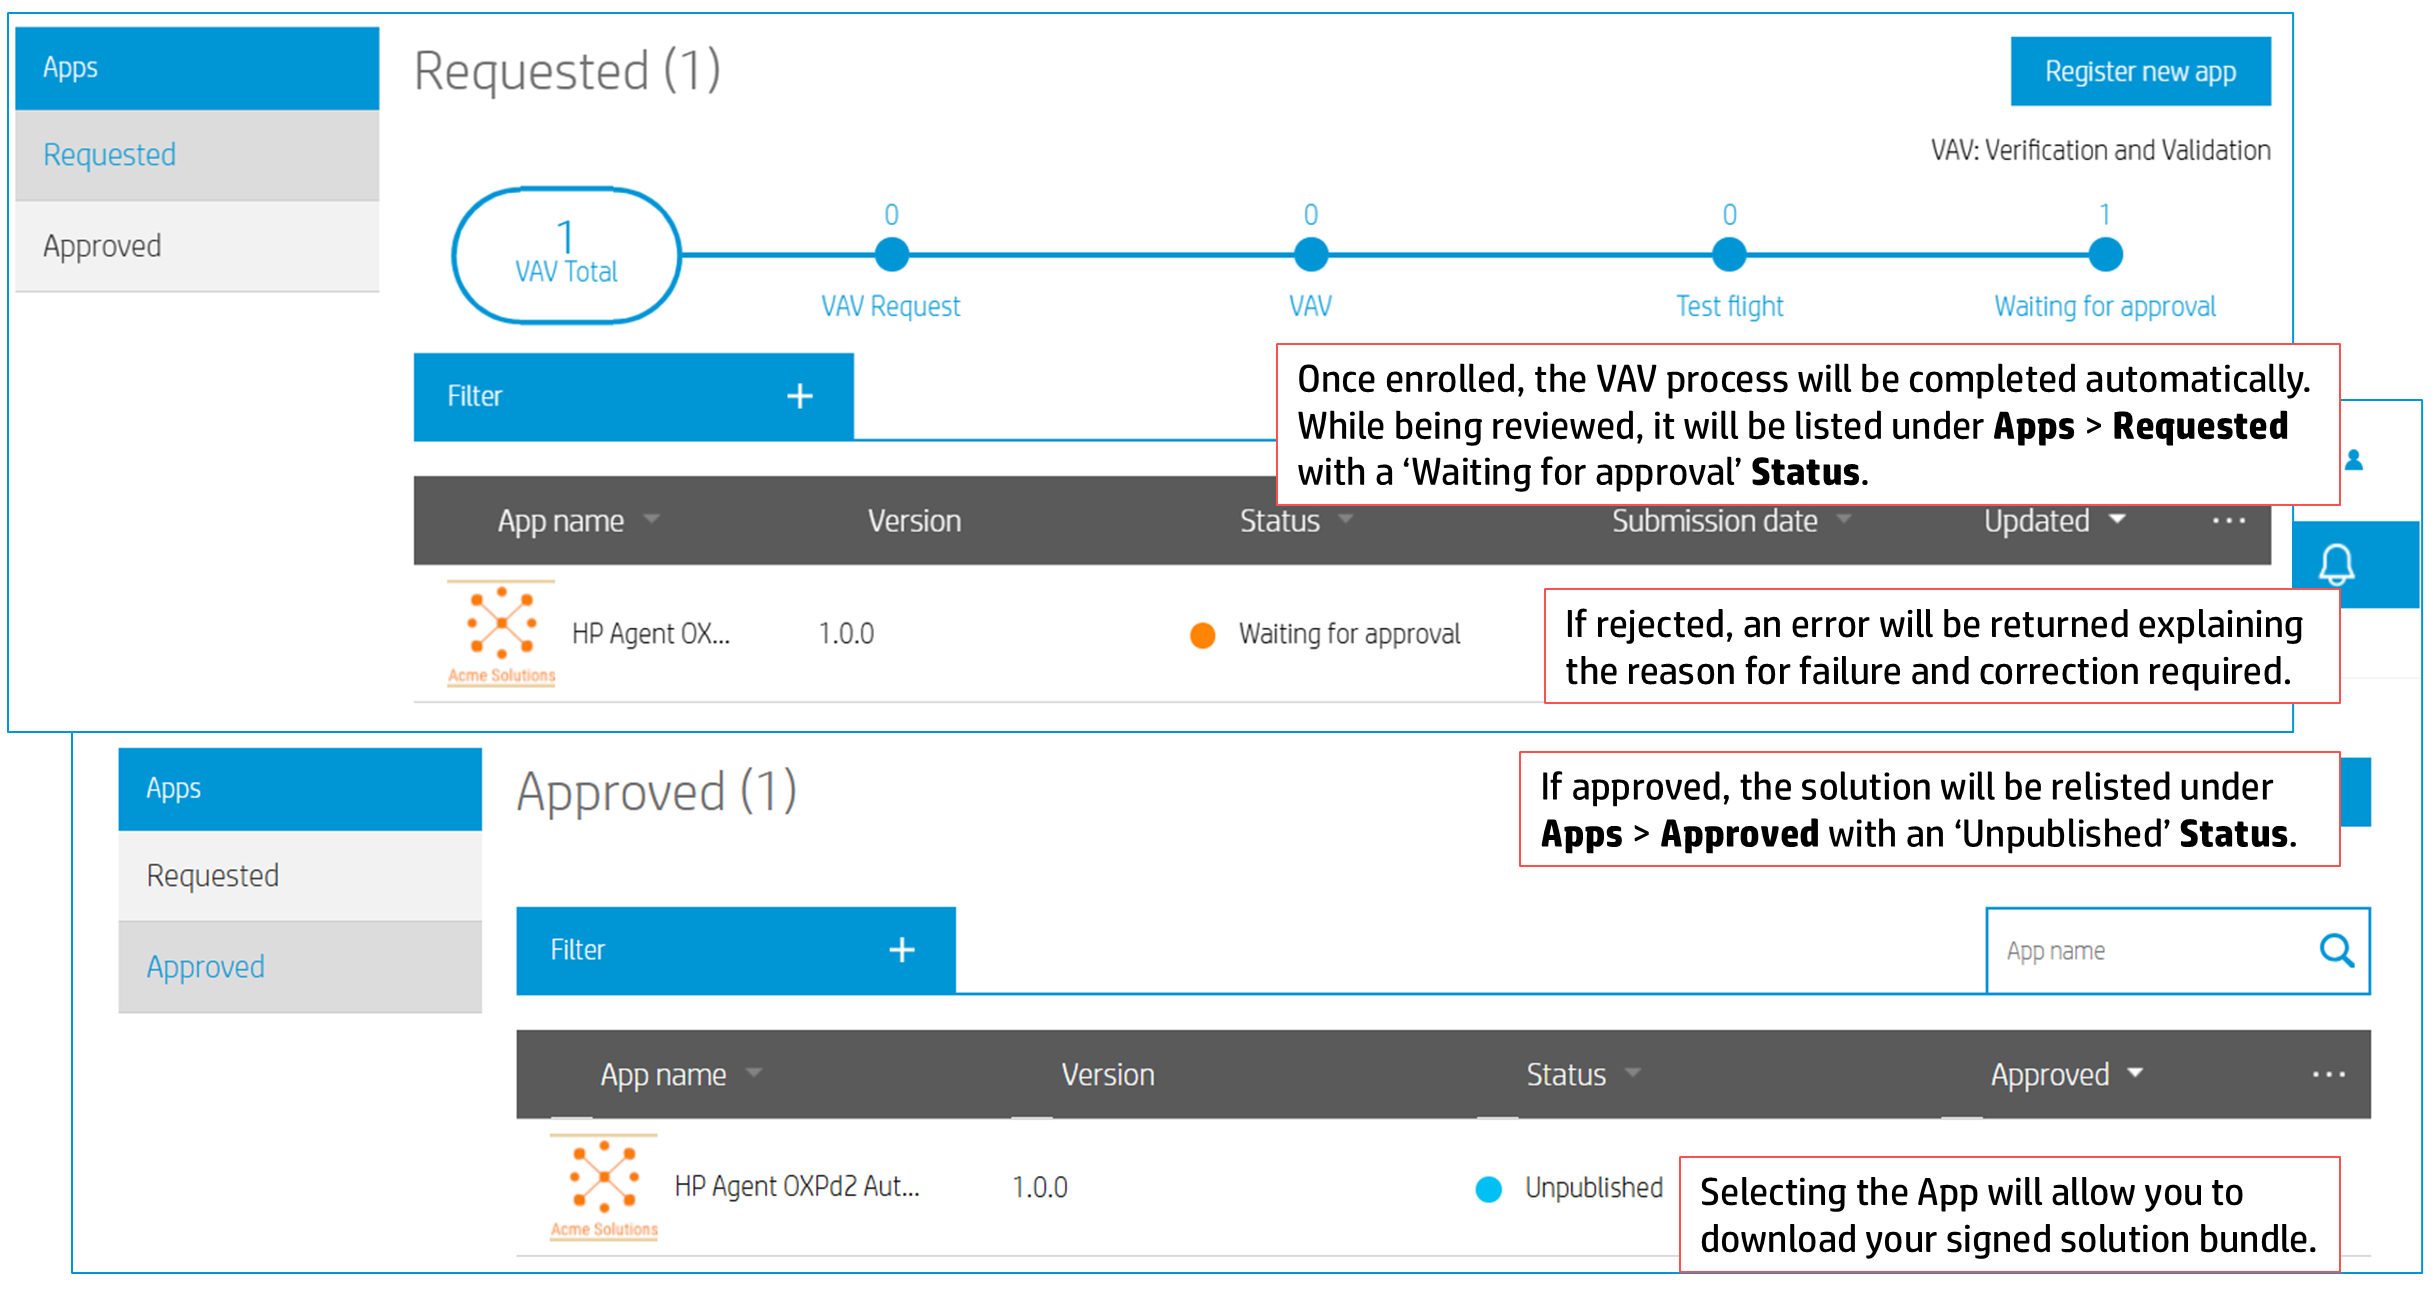
Note that while this is an automated process, HP may perform a more thorough review at any time. If security vulnerabilities are discovered on an already approved solution, HP will contact you with next steps.
Once approved, the solution will be marked as Approved and transferred to the Approved tab of the Apps page. The bundle will be signed and ready for distribution.
Approved Applications
Solutions that have been approved are listed in the Approved tab of the Apps page.
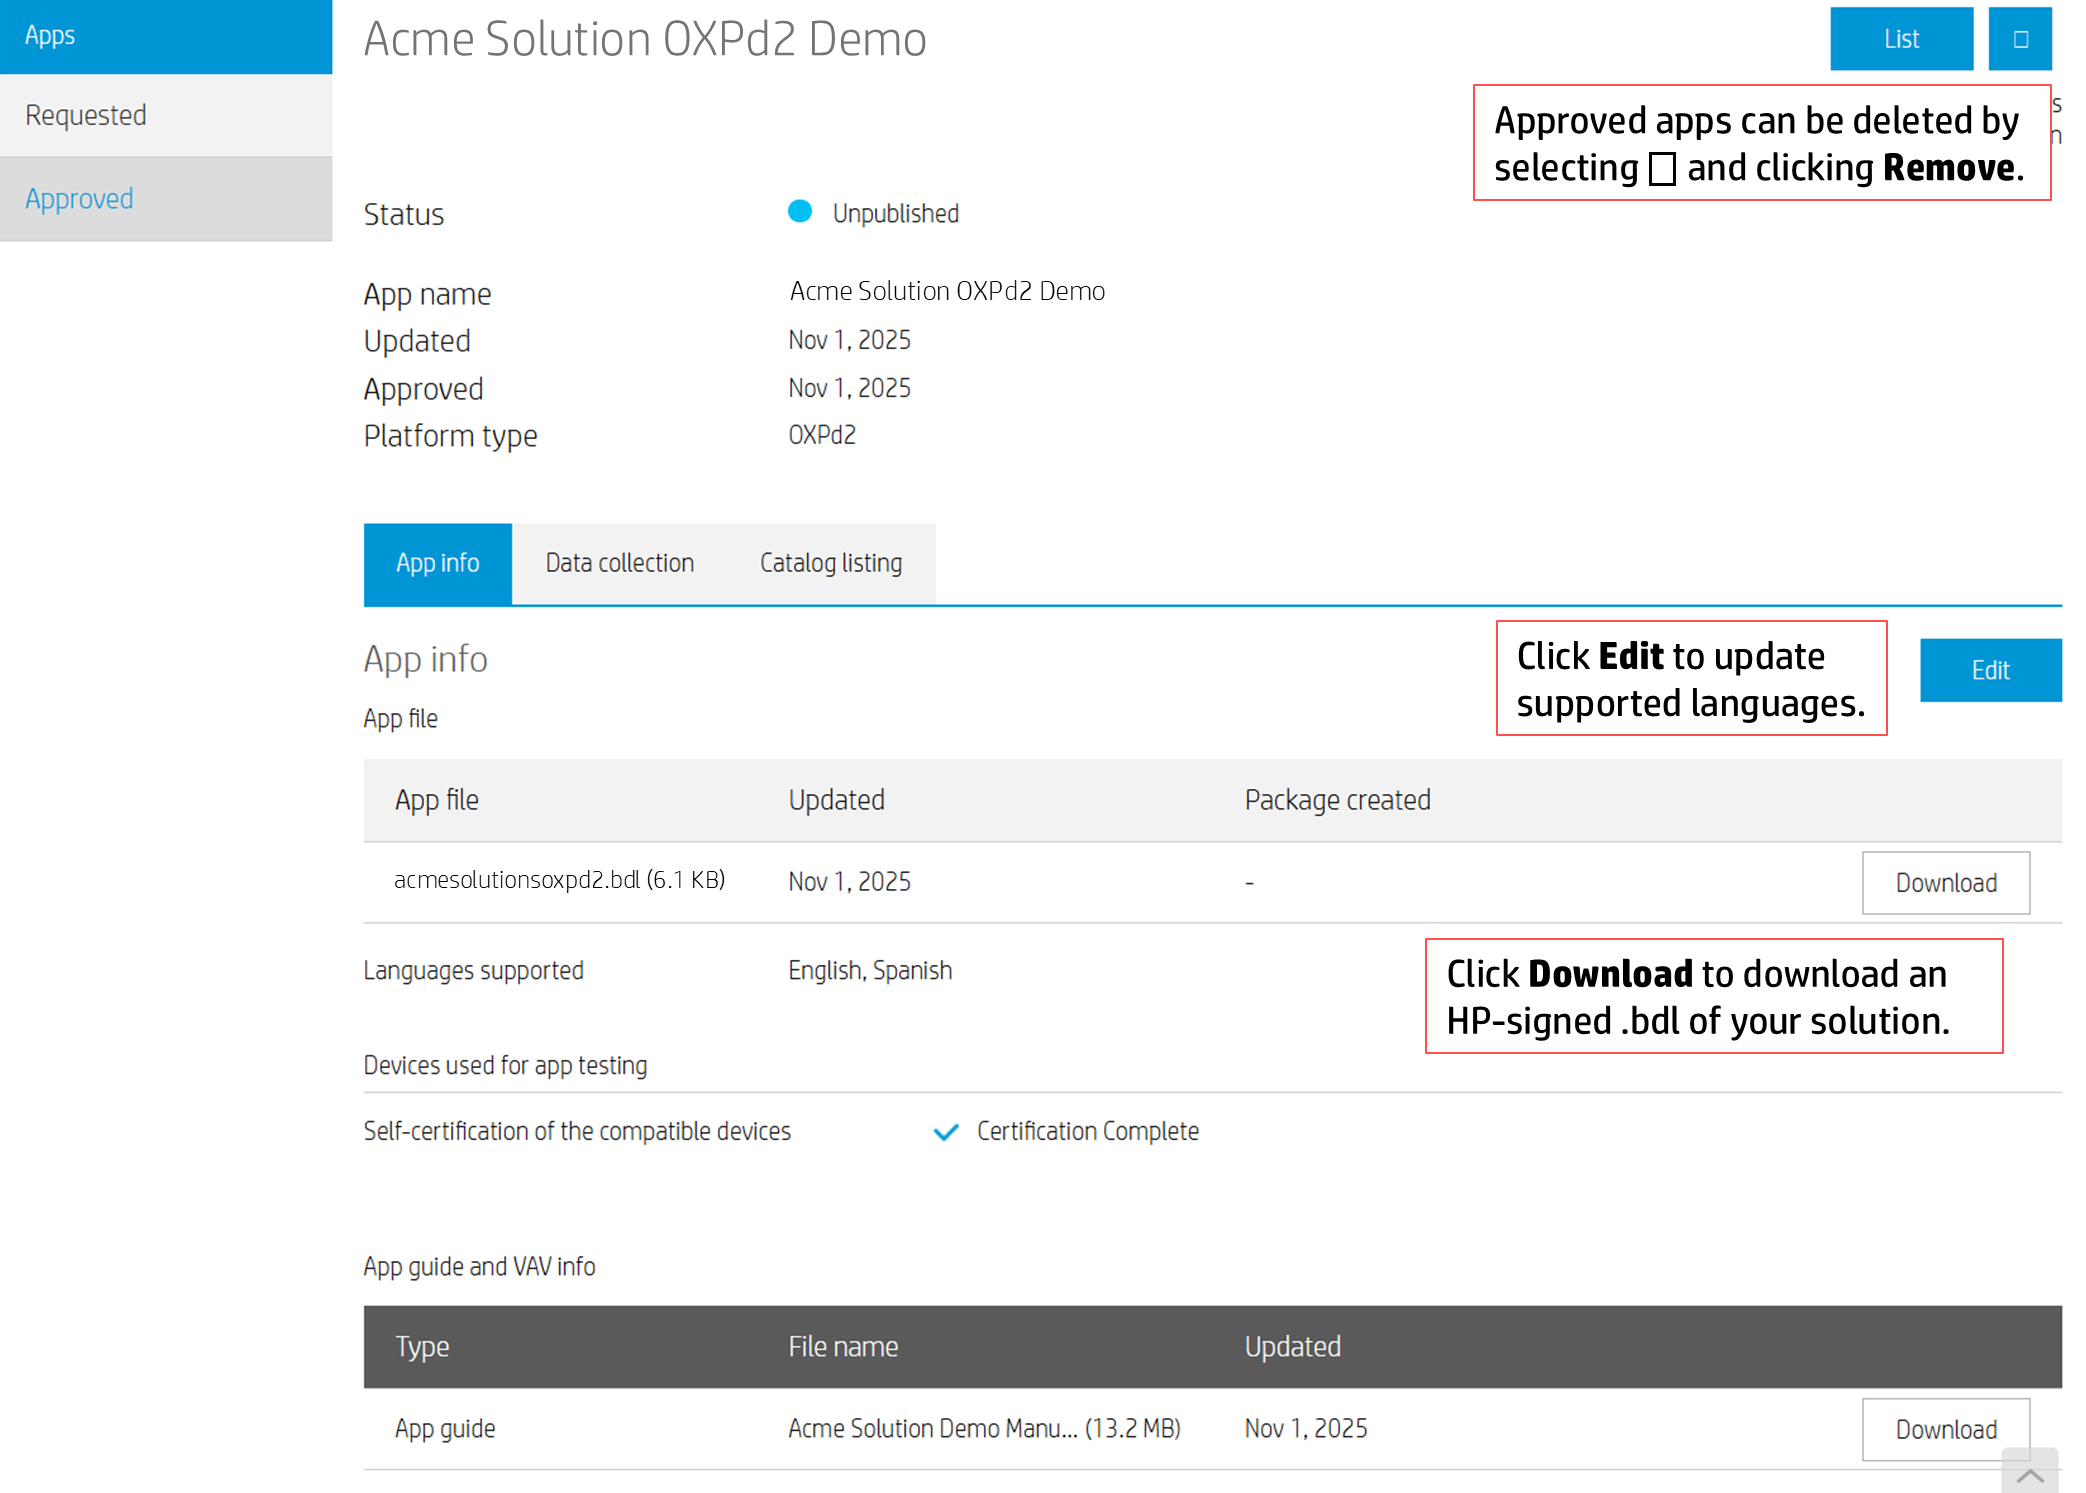
Select the solution you wish to view to open the app details page. This includes:
- Apps overview, which allows you to:
- Verify the Status of the solution.
- Note: Since OXPd2 solutions are not publicly listed, approved solutions have a status of “Unpublished”.
- Click List to return to the Approved apps list.
- Delete an approved solution:
- Select the square icon to open the drop-down menu.
- Click Remove.
- Warning: This will delete the approved version of this solution. You will have to resubmit it for approval.
- Verify the Status of the solution.
- App info tab, which allows you to:
- Click Download next to the App file .bdl file to download the signed solution bundle.
- Note: Upon approval, the original bundle that was uploaded will be replaced with an HP-signed bundle of the same name.
- Click Download next to the App guide file to download the solution user guide.
- Add languages or client credentials:
- Click Edit:
- Add additional localized languages by clicking Add in the Languages supported field.
- Add client credentials by clicking the Add button in the Client credentials field for use with the HP Token Proxy.
- Click Save to save any changes, or Cancel to discard changes.
- Click Edit:
- Click Download next to the App file .bdl file to download the signed solution bundle.
- Data Collection tab allows you to view the types of data collected by the solution.
- Catalog listing tab to view or Edit the following fields:
- Catalog Listing is view-only. This includes the App icons and Solution type and Industry type categories.
- Translated details for the primary and any secondary languages can be edited using the Edit button. Refer to Enrolling Solutions.
Your signed solution .bdl file can now be installed on compatible HP devices!